

"FN-49 Firing Pin Safety Upgrade" - Written by Robert Worth Baldwin
FN-49 FIRING PIN SAFETY UPGRADE
SYNOPSIS: A modification to the classic FN-49 battle rifle to make it safer top fire ammo (either factory or hand-loaded) that uses commercial primers.
by Robert Worth Baldwin
Introduction
Over 40 years ago, I was introduced to the FN-49 battle rifle by a good friend named Gene Lescallette. Gene was a serious character, a Korean War vet, and the most prolific collector of milsurp weapons I have ever known (at that time, he owned over 300 guns). Within this vast arsenal was an FN-49 in 30.06 caliber. I fell in love with it the first time he let me shoot it.
My FN-49s
In the early 1980s, I acquired an 8mm caliber Egyptian Contract FN-49 from Century International Arms. I did not have it long, however, as it double-fired the first time I took it to the range - on round 19 of a 20-round box of Winchester factory loads. The incident so terrified me that I promptly sent the rifle back.
However, my yearning for an FN-49 continued. Unfortunately, the specimens I encountered at gun shows over the years were usually worn out and beat up, or outrageously expensive; usually both. It was therefore with great glee that I eventually snapped up another Egyptian Contract FN-49 at a local gun shop. The rifle is in excellent condition (thanks to a Century Arms refurb) and was priced barely within my modest means, as the new wood and refinishing job had effectively erased the collector value that would otherwise attach to an “all original” rifle. I named the rifle “Eureka”, because, after over 25 years of searching, I finally found it! Figure 1 below shows Eureka following my stock refinishing job. I think she turned out to be very attractive indeed!

Figure 1. Eureka, My FN-49 Rifle
Realizing the Problem
My joy at finally acquiring a nice FN-49 was tempered by an intense determination to avoid a repetition of the multiple discharge event that had doomed my first FN-49. Having had significant experience with restoring and shooting milsurp rifles in the intervening years (consisting of an Indian Ishapore Enfield, a Russian M44 Mosin-Nagant; a Finnish M91 Mosin-Nagant; an Israeli K98 Mauser; a Yugoslavian 24/27 Mauser, a Chinese SKS, and a Swiss K31), I concluded that my previous malfunction had probably been caused by an accumulation of dried Cosmolene grease; sand, and/or dirt within the firing pin (FP) channel, which prevented the pin from fully retracting between shots. I therefore went to great effort to completely clean out and lube Eureka. It turned out that these efforts seemed unnecessary, as the previous owner had left her very clean.
As usual, I then proceeded online to learn all I could about my new prize before taking her to the range. I was immediately appalled to discover repeated references to slam-fires involving other FN-49 rifles. Many of these incidents were quite serious, involving out of battery (OOB) discharges resulting in wrecked guns and/or serious injuries.
Historical Background
My research also revealed that FN-49 slam-fire problems are nothing new. During the Korean War, FN-49s used by members of the Belgian Brigade suffered frequent breakages of the long, slender, one-piece firing pins that were originally issued with the rifle. After the pin broke, the front section of it frequently became jammed within the firing pin channel, thereby preventing that forward portion of the broken pin from fully retracting, resulting in a slam-fire. My Eureka came with such a one-piece FP.
FN responded to the FP breakage crisis by designing a two-piece firing pin that was essentially “pre-broken”, thus making both front and rear sections much more robust and breakage resistant. The one-piece FP design is shown in Figure 2 below; the two sections of the two-piece FP design are shown in figures 3 and 4. Apparently, this solution virtually eliminated FN-49 FP breakage. Unfortunately, as described below, it also induced some unintended problems.

Figure 2. One-Piece FN-49 Firing Pin
Improving My FN-49 Firing Pin
Upon learning these facts, I promptly ordered a two-piece FP. However, additional online research revealed several blog posts written by FN-49 owners who had experienced OOB slam-fires after installation of the two-piece pin.
WARNING: The following paragraphs describe modifications to the FN-49 firing pin. If done properly, I believe that these modifications will make this rifle safer to fire. IF DONE IMPROPERLY, THESE MODIFICATIONS HAVE THE POTENTIAL TO RENDER THE RIFLE VERY UNSAFE! I specifically disclaim all liability for any consequences that may ensue from either doing as I have done or failing to do so! PROCEED AT YOUR OWN RISK!!!
I therefore decided to take no chances. Using a Dremel tool, I shortened the tip of the FP VERY slightly (I overdid it the first time, which rendered my rifle completely safe – and totally unfireable). I then slightly flattened the FP tip using a flat hand file. I tested these modifications using handloaded rounds containing no gunpowder, but with live Large Pistol primers seated. I used pistol primers because they are more sensitive to impact than rifle primers, and therefore constitute a worst-case test.
After these modifications were completed, I repeatedly chambered these test rounds, allowing the bolt to slam home under full return spring power. No rounds went off, and the primers were only slightly marked by the FP. I say “marked”, because there was no indent that was deep enough to even be felt with a finger nail. I then chambered a case containing a Large Rifle primer, and pulled the trigger, whereupon I was rewarded by a satisfying BLAM (primers are much more powerful than most folks would imagine, given their small size). At the range, I repeatedly put the test rounds into the magazine, with a live round on top, allowing them to chamber normally following firing. Eureka passed all these tests with flying colors.
However, after firing a few dozen rounds, I was horrified to discover that my firing pin was jammed in the forward position, protruding from the bolt face. It was stuck so tightly that I could not push it back into the bolt in the field, but had to drive it out with a hammer and punch when I got back to my workshop. After stripping the bolt, I discovered that I could insert a large nail into the FP channel in place of the rear FP, and could easily push the forward FP until it firmly jammed in place every time.
Let’s Break for Some More History…
Upon close examination of the forward FP, I concluded that, in their haste to fix a wartime problem, the engineers at FN had inadvertently induced a different potential failure mode. They designed the new forward FP with a tapered section between the slender firing pin and the larger rear section (Figure 3).

Figure 3. FN-49 Forward Firing Pin
If driven far enough forward, the tapered section could jam into the rear hole of the firing pin channel, becoming solidly stuck. This failure mode was impossible with the old one-piece firing pin, as the rear of the pin incorporates a right-angle section that, for want of official nomenclature, I call a “forward travel limit tab”. This tab contacts a shoulder at the rear of the bolt, thereby physically limiting the forward movement of the firing pin (Figure 2). Therefore, the one-piece pin cannot get jammed in place, as long as it remains intact.
The forward travel limit tab also exists in the two-piece firing pin design (Figure 4). However, it now serves only to align the rear portion of the FP within the FP channel. When they created the two-piece FP design, FN decoupled the forward section of the FP from the rear section. Now, the only mechanism that limits forward FP travel is the firing pin return spring. Obviously, this small spring is too weak to prevent the forward FP from occasionally moving too far forward and getting stuck when the bolt slams closed during cycling. It is possible that the FP return spring has weakened due to age and/or use, but more likely that it cannot be strong enough to avoid the FP jamming problem, or it would prevent the FP from striking the primer with sufficient force, thereby causing misfires.
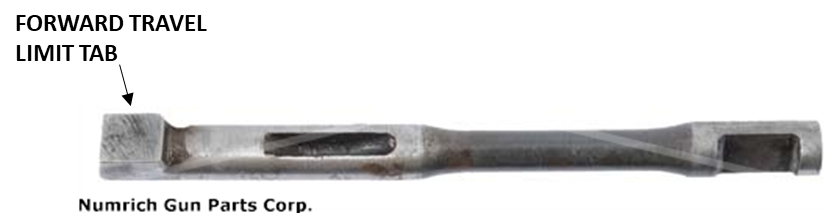
Figure 4. FN-49 Rear Firing Pin
Another issue is that the Egyptian Contract FN-49s did not incorporate a Firing Pin Safety Stop (FPSS). The FPSS was a part that locked the firing pin until the bolt was completely in battery; its purpose was to prevent out-of-battery slam fires. The FPSS fits into a recess machined into the top surface of the bolt, and incorporates a lock tab that engages a slot in the rear of the firing pin. Apparently, the Egyptians did not consider the FPSS necessary, and did not specify it in their production contract. Most Egyptian Contract FN-49 bolts are not even machined to accept an FPSS, nor were the Egyptian firing pins slotted. However, while FN was manufacturing FN-49 rifles for Egypt, they were also producing them for Venezuela under an earlier contract. The Venezuelan contract was much smaller (approximately 4,000 rifles for Venezuela, as opposed to more than 37,000 rifles for Egypt). As both contracts progressed, FN would occasionally run short of Egyptian-contract bolt assembles, and would use Venezuela-pattern bolt assemblies instead.
This is the case with my gun – it is fitted with a Venezuela-pattern bolt, which contained a one-piece firing pin slotted to accept a Firing Pin Safety Stop. Obviously, I would love to equip my FN-49 with an FPSS, as it would add an extra margin of operational safety. Unfortunately, the Venezuela-pattern bolts accept what collectors call a “spring type” FPSS. FN later changed this part to a “plate type” FPSS, which is not interchangeable.
Because the “spring type” FPSS was only used on the Venezuelan rifles, it was made in small quantities, and is now seemingly impossible to obtain as a spare part. Some of them have doubtless broken during use. More have undoubtedly been lost, as the FPSS is removed during routine field stripping. Those FN collectors fortunate enough to have a Venezuela Contract FN-49 with an intact FPSS will not part with it for love or money. If anyone knows where I can buy a “spring type” FN-49 FPSS, please let me know!
So Much for the History Lesson, Now Back to the Project!
Upon examination, it was evident that the ideal solution to this problem would be to re-machine the forward firing pin to convert the taper into a right-angle shoulder. A skilled machinist with proper tools could undoubtedly accomplish such a modification in short order. Unfortunately, I possess neither finely honed machining skills nor proper tools.
Therefore, I improvised. I concluded that I could solve the problem if I could grind down the taper to a sufficiently small diameter, and move it far enough back. I contrived a grinding jig by taping some 200-grit sandpaper across the edge of a section of 2 x 6 board, which I C-clamped to my bench.
I then chucked the firing pin into my cordless drill, and proceeded to grind away, stopping at frequent intervals to reinsert the FP into the bolt and see if it would still hang up (and to reinsert it into the drill after it fell out, which it did several times). Eventually, I created a re-profiled forward FP that will not stick in place no matter how hard I drove it forward. It can now protrude a long way beyond the bolt face, but that does not matter in practice, as the travel is limited by the presence of a primer in front of it and a retraction spring behind it during the firing cycle. An unmodified forward firing pin (left) is compared to my re-profiled pin (right) in Figure 5 below. Note that the tip of the firing pin has been slightly flattened, making it VERY SLIGHTLY shorter, and the tapered section is now a few millimeters farther back, as well as being somewhat smaller in diameter.
NOTE: I have deliberately omitted dimensions, as this modification was the result of a trial-and-error process using crude tools and methods. Therefore, the dimensions of my modified firing pin are in all likelihood not optimum. In addition, due to tolerance stacking, dimensional wear, and other random factors, optimum dimensions for one rifle may not be ideal for any other rifle.

Figure 5. Original (Left) and Re-profiled (Right) FN-49 Forward Firing Pins
After reprofiling my forward FP, I repeated my slam-fire tests using my special test rounds, both in the shop and at the range, without incident. I have so far fired approximately 400 rounds through my FN-49. A few of them were Romanian milsurp rounds, most were my own handloads, using a variety of FMJ and soft-nose bullets, with Winchester primers. Chambering, firing, and extraction have been 100% reliable.
With these modifications, I feel that my FN-49 is now at least as resistant to OOB slam fire as any other rifle. Should you do likewise, I hope these mods work out well for you also.
NOTE: Constructive feedback regarding this article is welcome. Please send to rbaldwin56@verizon.net.